Import Jobs into Route Planner
What are Jobs?
Jobs are customizable, independent tasks that can be performed at a specific location. Any task involving pick-up or delivery of items, or completing simple repairs / maintenance. Further customization can be achieved by specifying details such as time windows, quantity, service time, priority, or required skills.
How to Import Jobs in Route Planner?
Route Planner can optimize a large number of daily tasks by importing data from a CSV or excel file. You can either download a sample CSV template and modify it to add your data or provide your own file saved on your computer.
Step 1: Ensure “Jobs” Data is in the Right Format
Before importing, ensuring that the data in the file adheres to the required format is critical. The following job-related fields and their corresponding formats are necessary for Route Planner compatibility:
| Item Name | Required | Description / Examples |
|---|---|---|
| ID | Yes | A unique identifier for each job. Supports text values. Example: “123” Example: Job 1 |
| Description | Any custom description for the job. It should only be in text. | |
| Location | Yes | Provide the location coordinates where the job needs to be performed. You can either provide the latitude and longitude coordinates in separate columns or both of them together in a single column. While mapping, use the correct map keys to reflect the way in which locations have been added. |
| Service time | The time required to perform the job, in seconds. Accepts positive integers only. Example: 300 | |
| Skills | Specify the skill needed to perform this job. When optimizing, the app will assign the job to a vehicle having all the required skills. Accepts positive integers only. Example: 110 | |
| Start Time | The start of the time window after which the job can be performed. Format: YYYY-MM-DD HH:mm | |
| End Time | The end of the time window before which the job has to be started. Format: YYYY-MM-DD HH:mm | |
| Depot IDs | The IDs of the depots which can fulfill this job. In case of a delivery type job, only the vehicles which can start from one of the specified depots, can fulfill the job. On the contrary, a pickup type job can be fulfilled by only those vehicles which can end their route at one of the specified depots. If the job can be fulfilled by any one of multiple depots, add all such depot IDs in separate columns and use the map keys “Depot 1”, “Depot 2” and so on, as needed. Only integer values are supported. | |
| Priority | Specify the priority of this job. The valid values are in the integers in the range of [0, 100]. Setting a priority will only decide whether this job will be assigned or not, but has nothing to do with the sequence of job fulfillment. Example: 95 | |
| Setup | Specify the time needed to complete the necessary setup before/after performing the job, in seconds. This can be used for any one time activity like parking, or recording information for compliance, setting-up equipment. Please note that setup time is applied only once for a given job location. Example: 120 | |
| Pickup Capacities | The quantity of the items that need to be picked-up for this job. You can provide quantities in multiple units/dimensions (e.g., weight, volume etc) in separate columns and map these columns to “Pickup Capacity 1”, “Pickup Capacity 2” and so on while adding map keys. Supports integer values only. Only one of Pickup Capacities or Delivery Capacities can be specified for a given job. | |
| Delivery Capacities | The quantity of the items that need to be delivered for this job. You can provide quantities in multiple units/dimensions (e.g., weight, volume etc) in separate columns and map these columns to “Delivery Capacity 1”, “Delivery Capacity 2” and so on while adding map keys. Supports integer values only. Only one of Pickup Capacities or Delivery Capacities can be specified for a given job. |
Step 2: Import the “Jobs” File into Route Planner
On the file import widget
- Navigate to the Jobs section on the left menu.
- Click on the Upload a CSV button.
- In the pop-up window, select the file with “Jobs” data prepared as per the guidelines above.
- Click Open to import the file.
Step 3: Mapping “Jobs” Attributes to File Columns
After the job file is successfully imported, the next step is to match the columns in the sheet to the available fields in Route Planner. You can select the information a CSV column represents, from the corresponding “Map Key” dropdown.
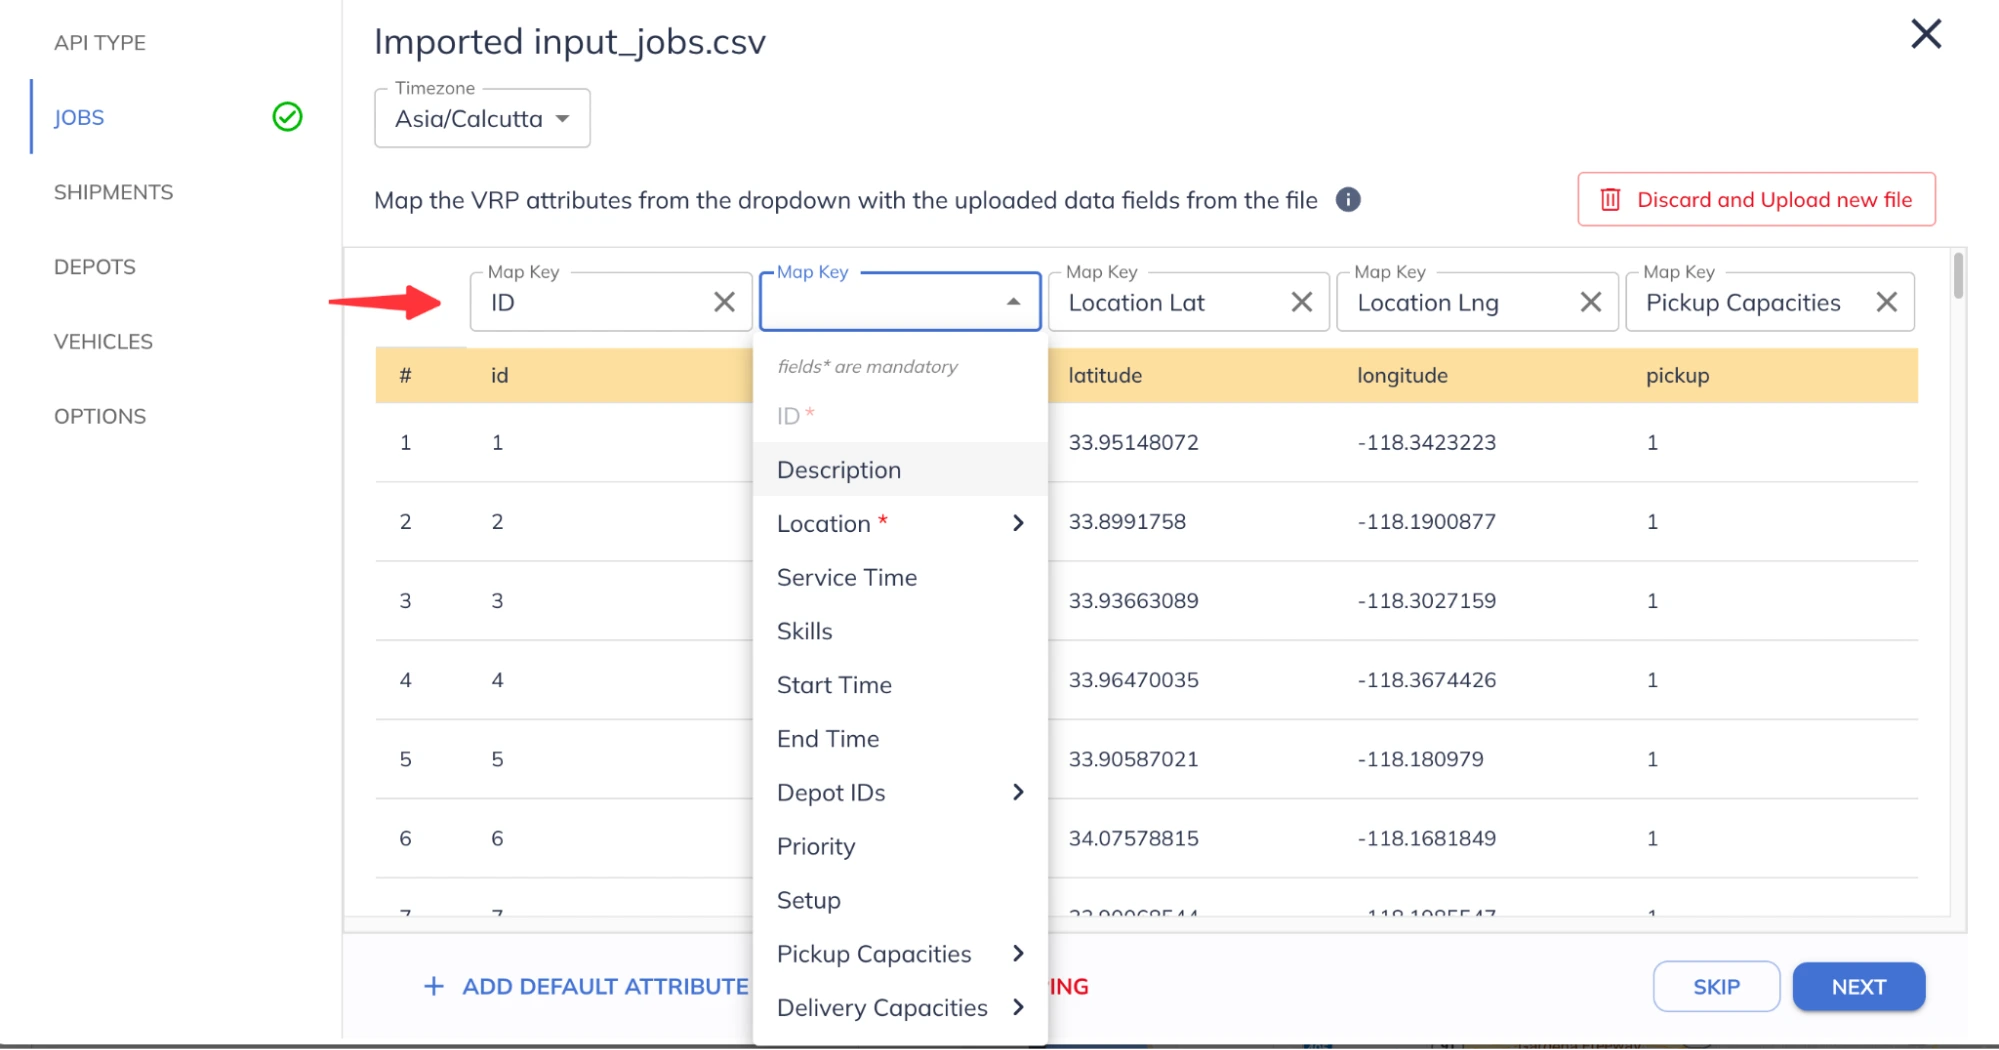
Job attributes
Ensure that all columns are correctly filled with the right data and format, and there are no empty fields, as this may cause errors during import.
To discard current mappings click “Reset Field Mapping”. Else, click “Discard and Upload new file” to import a different file.
The job import process is completed once the mappings are done. To validate the data format and mappings click “Next”. If there are any errors in the data, corresponding errors will be highlighted for correction. Otherwise, upon a successful validation, the import widget moves to the next section.