Getting Started
To begin your journey with NextBillion.ai's Flutter Maps SDK, make sure you have met the necessary prerequisites, as outlined in the Prerequisites section. Then, proceed with the step-by-step installation instructions to integrate the SDK into your Flutter project.
Prerequisites
Before integrating the SDK into your application, ensure that your development environment meets the following prerequisites:
Access Key:
- Obtain a valid access key from our platform. This access key is essential for authentication and enables you to utilize the SDK's services.
Platform Compatibility:
- Android: The minimum supported
minSdkVersionis 16+ or higher. - iOS: The minimum supported version is iOS 11 or later.
Flutter Framework:
- The SDK requires Flutter version 3.10 or later to function properly within your Flutter application.
CocoaPods (for iOS):
- For iOS projects, ensure that CocoaPods version 1.11.3 or later is installed.
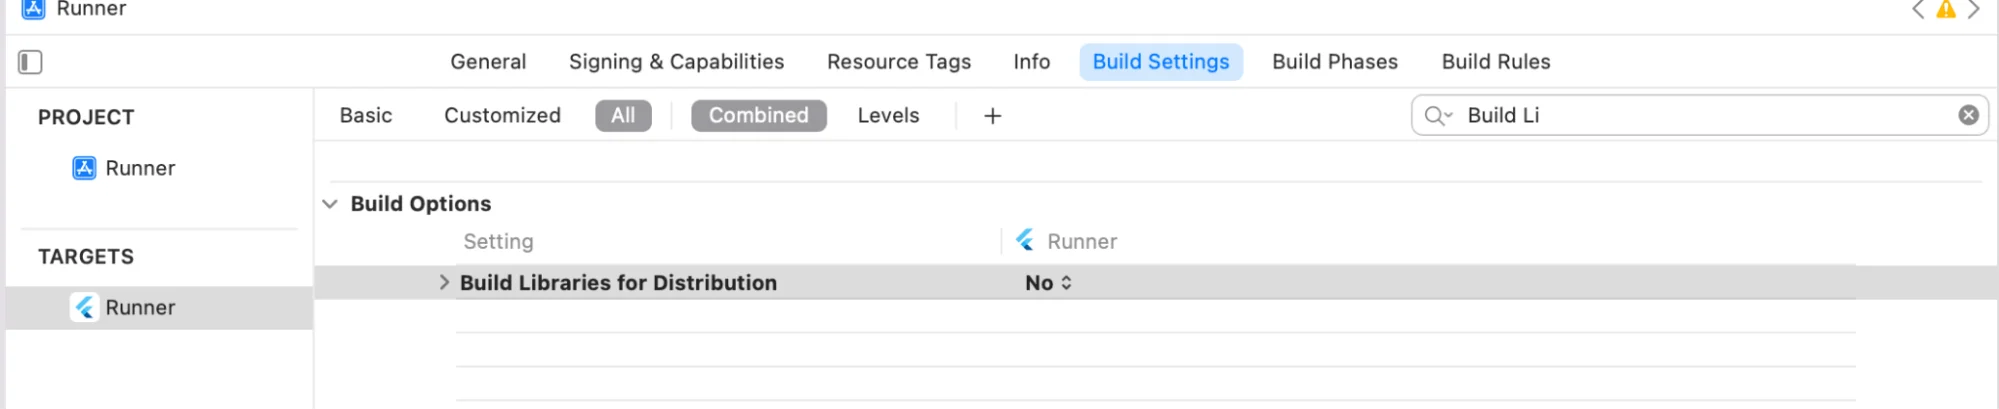
Build Configuration (for iOS):
-
In your iOS project's build settings, set "Build Libraries for Distribution" to "No" to ensure the proper functioning of the SDK.
By meeting these prerequisites, you can guarantee a smooth and successful integration of our SDK into your application. These requirements have been established to ensure compatibility and optimal performance, enabling you to leverage the full potential of the SDK's features.
Installation
To integrate NextBillion.ai's Flutter Maps SDK into your Flutter project, follow the steps below:
Step 1: Add Dependency
Add the following dependency to your project's pubspec.yaml file, replacing {version} with the actual version of the SDK that you want to use, For the latest version, check out the Fluter Maps Plugin:
For the latest version, check out the Fluter Maps Plugin. Ensure that you have the correct version specified to utilize the latest features and improvements.
Step 2: Import the Plugin
In your Dart code, Import the maps plugin to access its functionalities:
Step 3: Initialization
To run the Maps Flutter Plugin you will need to configure the NB Maps Token at the beginning of your Flutter app using NextBillion.initNextBillion(YOUR_ACCESS_KEY). Obtain your access key from NextBillion.ai and initialize it as follows:
Replace YOUR_ACCESS_KEY with the access key provided to you by NextBillion.ai. This initialization step is essential to authenticate your app and enable seamless communication with NextBillion.ai's services.
NBMap Widget
The NBMap widget is the foundation of NextBillion.ai's Flutter Maps SDK, allowing you to seamlessly integrate interactive maps into your application. With this widget, you can define the initial camera position and respond to map creation events through the onMapCreated callback.
Widget Creation
To create an NBMap widget with an initial camera position, use the following code snippet:
Widget Properties
-
onMapCreated: This property accepts a callback function that is invoked when the map is created and ready for interaction. You can access the map controller through this callback to perform various map-related tasks.
-
initialCameraPosition: Use this property to set the initial camera position of the map when it is first displayed. The
CameraPositionclass allows you to define the target coordinates (latitude and longitude) and the initial zoom level of the map.
Example
Here's a quick example demonstrating the use of the NBMap widget:
In this example, the MyMapScreen widget contains an NBMap widget, and the onMapCreated callback function stores the map controller in the mapController variable. This allows you to perform various map operations using the controller throughout your app's lifecycle.